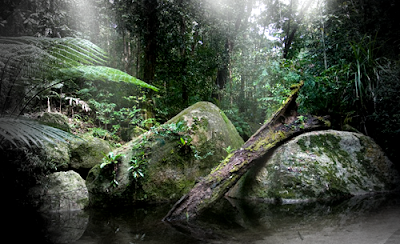
Dreamy Effect
Sunday, June 3, 2007
This is quite a useful effect in paint shop pro, quite common in the media. It is actually meant to enhance an image.
This short tutorial will help ppl who don't know learn how this effect is achieved.
Before I start, lets take a look at the final result:

So, lets learn how to do it. :)
1st, Choose your Image:
For this tut, this image choosen is a pic of a rainforest, found in google.
Copy the picture and paste it into your paint shop
2nd, Duplicate the Layer and Greyscale it:
Now, you have to duplicate the background layer (rightclick the background layer in the layers toolbar, and click duplicate).
In the duplicated background layer, you have to greyscale it. This is done by colorizing it with a saturation of 0. (adjust>>color and contrast>>colorize)
3rd, Showing the Colored Image Through the Greyscaled one:
Choose the freehand selection tool, then use these settings (point to point, replace, feather: 83)
Select the middle of the pic, leaving a thick area around the selection, then delete the selected region.
4th, Bluring the Sides:
Selecting the Parts to Blur:
Select the whole of the greyscaled layer. Now, with the freehand selection tool with the feather on, change the replace to remove. Then, select the region not to be blurred (a bit smaller then the area of the image). The following screenshot shows you how the selection should look like.
Applying the Blur:
We do a Gaussian blur of strength 20. (Adjust>>Blur>>Gaussian blur)
5th, Adding Some Shadding Along The Sides: (optional)
Using the air brush tool with the folling settings (Shape: Circle, Size: 251, Hardness: 79, Step: 5, Density: 100, Opacity: 4, Blend mode: Normal)
6th, Adding Some Light Rays: (Cool Effect)
Drawing the lightrays paths:
Create a new layer. (Rightclick the current layer in the layers toolbar and cleck new raster layer)
Choose the Freehand Selection Tool again. But this time, set the feather to 0. Use it to make selections that look like lightrays (some thin pointed triangles that poke down from the top of the pic). With the selection, use the Paint Bucket Tool and fill them up with white, opacity 100%.
Realizing The LightRays:
Select the whole layer 1st. Now, give these selections a Gaussian Blur of strength 15.00
7th, Enchancing The Image:
In the Layers toolbar, Rightclick the topmost layer, and go to new adjustment layer, and click on bright and contrast. Then in the popup window, apply the following settings (Brightness:10, Contrast: 25)
Thats all for this tutorial. If you really followed this tut, you may wanna use this image for... what ever you want, but do save it in a high quality png first. You can actually use the techniques like the light ray effect and the greyscalling effect in your other graphics. Hope this tutorial had helped you gratly. :)
Labels: Graphic Tutorials


<< Home